
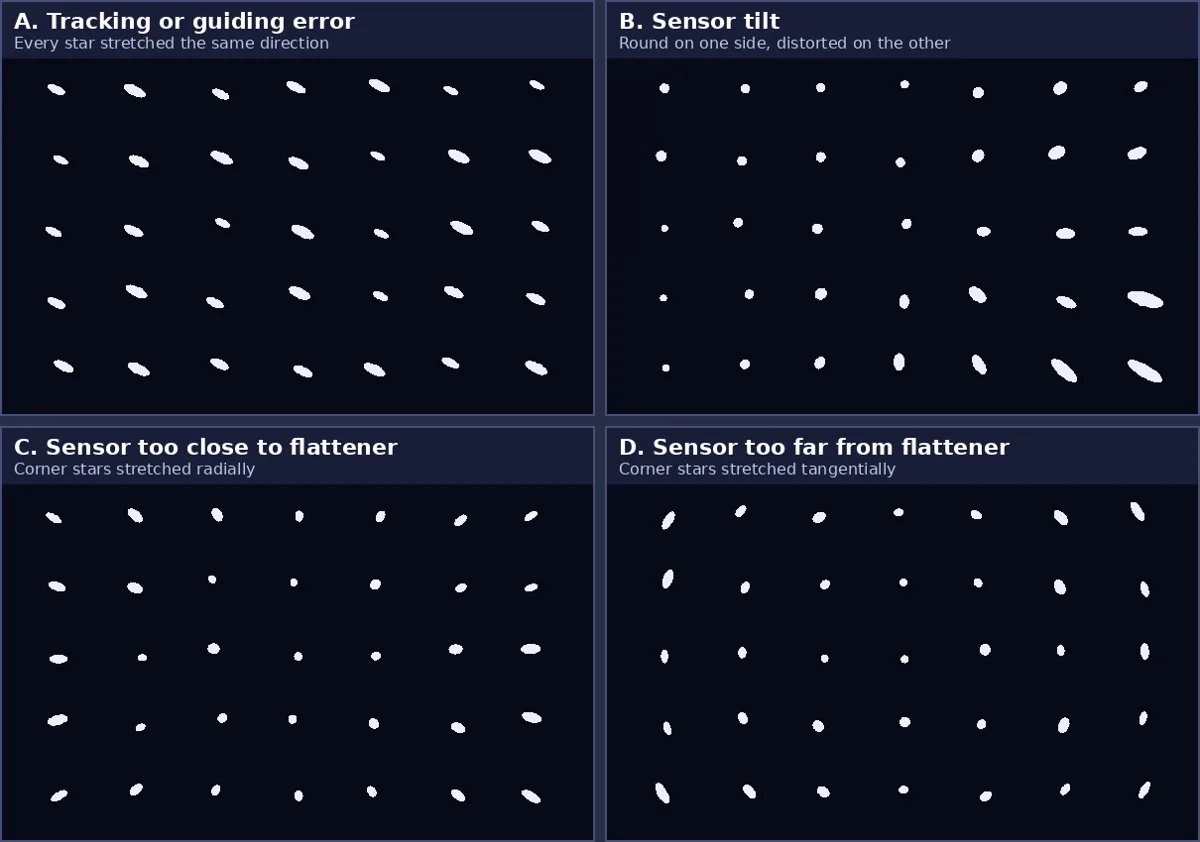
Quick answer: Read the pattern before changing anything. If every star in the frame is stretched in the same direction, the cause is motion: tracking, guiding, wind, balance or differential flexure. If stars are round in the center but stretched in all four corners, the field flattener or reducer spacing is wrong: radial stretching means the sensor is too close, tangential stretching means it is too far. If one side or corner is worse than the others, the sensor is tilted.
As an Amazon Associate, Midwest Astronomy earns from qualifying purchases.
Elongated stars are the most common complaint once you move past your first images, and they are frustrating because the same symptom has completely different causes. Adjusting backfocus will never fix a guiding problem, and a better mount will never fix a tilted camera. This guide shows you how to tell them apart in a few minutes and then fix each one.
Step 1: Look at a single calibrated sub, not the stack
Stacking averages many frames and can hide or blend problems. Open a single sub-exposure (calibrated, and debayered if you use a color camera) at 100% and inspect the center and all four corners. Siril’s Aberration Inspector (right-click the image) builds a 3×3 mosaic of the center, edges and corners so you can compare them side by side. ASTAP has a similar aberration inspector, and N.I.N.A.’s Hocus Focus plugin can map star sizes across the frame during capture.
Then compare several subs from different times in the session. A problem that appears in some frames but not others points to motion. A problem that is identical in every frame points to the optics or imaging train.
Step 2: Match the pattern to the cause
| What you see | Most likely cause | Where to look |
|---|---|---|
| All stars stretched the same direction, in some or all subs | Tracking, guiding, wind, cable drag, balance | Mount, guiding graph, cables |
| All stars stretched the same way, guiding graph looks good | Differential flexure | Guide scope rings, focuser, camera mounting |
| Stars rotate in arcs around one point, worse at the edges | Field rotation from poor polar alignment (long unguided or alt-az frames) | Polar alignment |
| Round in center, stretched radially in all four corners | Sensor too close to flattener or reducer | Backfocus spacing |
| Round in center, stretched tangentially in all four corners | Sensor too far from flattener or reducer | Backfocus spacing |
| One side or corner worse than the opposite one | Sensor tilt (or a sagging focuser) | Camera-to-scope connection, tilt plate |
| Comet-shaped stars pointing outward from center (Newtonian) | Coma; missing or mis-spaced coma corrector | Coma corrector, spacing |
| Corners soft and bloated (not stretched), no flattener | Field curvature | Add a flattener |
| Triangular or spiky odd shapes, often on cold nights | Pinched optics | Mirror clips, lens cell |
| Stars stretched in a cross shape around focus | Astigmatism or collimation | Collimation |
The sections below walk through each group.
Motion problems: tracking, guiding and wind
When every star is stretched the same direction, the camera moved relative to the sky during the exposure.
Find the axis. Note the direction of elongation relative to right ascension (RA) and declination (Dec). Plate solving your sub or reading the guiding graph will tell you which way RA and Dec run across the sensor.
- Stretched along RA: periodic error, poor RA guiding, RA imbalance, or exposure too long for unguided tracking.
- Stretched along Dec: polar alignment drift (unguided), Dec backlash, or Dec guiding problems.
- Random directions, some subs only: wind gusts, a bumped tripod, a cable snagging, or a mount that slipped in its clutches.
Fixes, in order of effort:
- Shorten the exposure and see whether the problem disappears. If 60-second subs are round and 300-second subs are not, the mount is the limit.
- Redo polar alignment. See our how to polar align guide. Good polar alignment reduces Dec drift and field rotation.
- Rebalance. Balance RA slightly east-heavy and Dec slightly heavy on one side so the gears stay engaged in one direction.
- Manage cables. Route them along the mount with slack at the axes and strain relief, so they cannot snag or pull as the mount turns. Cold makes cables stiffer.
- Shield from wind. Lower the tripod legs, use a dew shield cautiously (it acts as a sail), or image from the lee side of a building or vehicle.
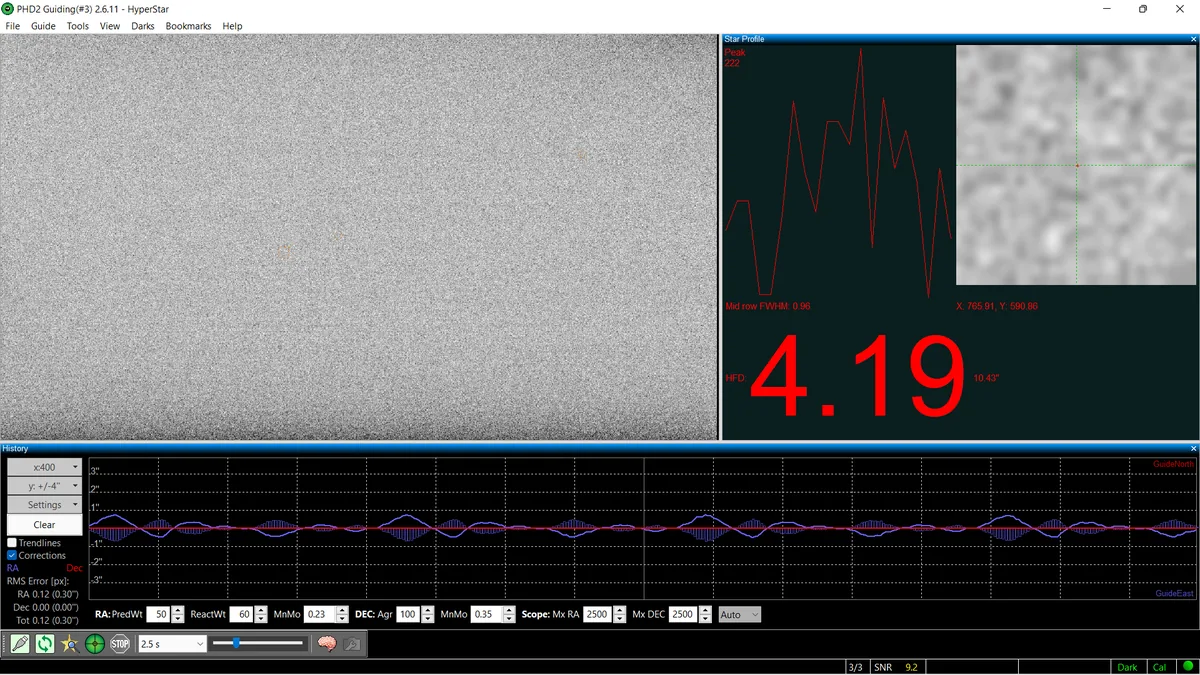
- Guide, and check the graph. In PHD2, aim for a total RMS around half your imaging scale in arcseconds per pixel or better. Large spikes or a sawtooth pattern in Dec suggest backlash; a slow wave in RA suggests periodic error. Our astrophotography troubleshooting guide covers reading the graph.
Differential flexure: the problem guiding cannot see
If the guiding graph looks excellent but stars still elongate in longer subs, suspect differential flexure. The guide camera and the main camera are moving relative to each other, so the guider holds its star steady while the main image drifts.
Common sources:
- A guide scope held in loose rings or on a flexible bracket
- A heavy camera and filter wheel sagging on a focuser that is not locked
- A cable pulling on the guide camera or main camera
- Mirror movement inside SCTs and some Newtonians (“mirror flop”)
How to confirm it: look at the drift direction across a sequence. With flexure, the elongation usually grows steadily as the scope moves across the sky and changes direction after a meridian flip.
Fixes:
- Tighten guide scope rings and swap any adjustable-ring mount for a rigid one.
- Lock the focuser and use a rack-and-pinion or a locking compression ring rather than thumbscrews on soft brass.
- Support heavy imaging trains and route cables so they do not pull.
- Switch to an off-axis guider (OAG), which picks off a guide star through the main telescope so both cameras share the same optical path. An off-axis guider is the standard fix for long focal lengths and SCTs.
Backfocus spacing: corners stretched symmetrically
Field flatteners and reducers are designed to produce a flat, sharp field at one specific distance from the sensor, the backfocus distance. Many are designed for 55mm, but always use the figure your manufacturer specifies. If the spacing is wrong, the center stays sharp while the corners distort, and the distortion is roughly the same in all four corners.
William Optics’ image plane calibration guide describes the two signatures clearly:
- Sensor too close: stars stretch in the sagittal (radial) direction, pointing toward or away from the center. Add spacing.
- Sensor too far: stars stretch tangentially, around the center like a swirl. Remove spacing.
How to fix it:
- Add up the real optical path: camera flange-to-sensor distance (for example, ZWO lists 17.5mm for the ASI2600 Pro), plus every adapter, spacer, filter wheel and tilt plate in the train.
- Account for filters. A glass filter in a converging beam pushes the focal plane back by roughly a third of its thickness, so add about one-third of the filter thickness to your spacing. With a 1.85mm-thick filter, that is roughly 0.6mm.
- Adjust in small steps using thin spacer rings (often 0.1-1mm), or the built-in adjustment on flatteners that have one.
- Refocus after every change, shoot a test frame of a dense star field, and compare corners again.
Repeat until corner stars are as round as the center, or until changing spacing in either direction makes them worse.
Sensor tilt: one side worse than the other
Tilt means the sensor is not square to the optical axis, so one edge sits closer to the focal plane than the opposite edge. The signature is asymmetry: stars round on one side of the frame and stretched or bloated on the other, or one corner far worse than the rest. Tilt becomes much more visible with large sensors and fast focal ratios.
Measure it. In Siril, run tilt on a calibrated sub (or seqtilt on a sequence for better accuracy). Siril reports the difference in FWHM between the best and worst corners as a percentage; its documentation notes that a value above 10% indicates a tilt problem. ASTAP’s aberration inspector, N.I.N.A.’s Hocus Focus plugin, PixInsight’s FWHMEccentricity script and the commercial CCD Inspector offer similar maps.
Fix it:
- Check the mechanical basics first: seat every threaded connection fully, tighten compression rings evenly, and make sure the focuser is not sagging under load. Many apparent tilt problems are a loose adapter.
- Rotate the camera 90° and re-measure. If the bad corner moves with the camera, the tilt is in the camera or adapters; if it stays put, it is in the focuser or optics.
- Use a tilt adjuster. Many refractors have built-in tilt adjustment, and ZWO, QHY and others sell tilt adjustment plates that fit between the camera and the rest of the train.
- Adjust in very small increments, refocus, re-measure, and repeat.
Correct spacing before chasing tilt, or at least make sure the spacing error is small; the two interact, and a combination of both can look confusing.
Optical design limits: coma and field curvature
Some star shapes are not faults in your setup; they are the optics doing what they were designed to do without correction.
- Coma in Newtonians: fast Newtonian reflectors show comet-shaped stars that flare outward toward the edges. A coma corrector at the correct spacing fixes it.
- Field curvature in refractors: without a flattener, the focal plane is curved. Center stars are sharp and corner stars are bloated and soft. A matched flattener or reducer-flattener fixes this.
- Lens aberrations on camera lenses: wide-open fast lenses often show coma and astigmatism in the corners. Stop down by 1/3 to 1 stop.
Cold nights: pinched optics and focus shift
Midwestern winter sessions add their own star-shape problems. As temperature drops, metal contracts faster than glass. Tight mirror clips or lens cells can squeeze the optics and produce triangular or oddly shaped stars, which is called pinched optics. The fix is to slightly loosen the mirror clips (Newtonians) or have the lens cell serviced, and let the telescope reach ambient temperature before imaging.
Focus also shifts as the tube contracts. Soft, bloated stars that worsen through the night are usually focus drift, not elongation. Refocus with a Bahtinov mask or schedule autofocus by temperature change.
A systematic fix order
When you are not sure where to start, this sequence avoids chasing the wrong problem:
- Inspect a single sub at 100% with an aberration inspector.
- Compare several subs over time. Changing shapes mean motion; identical shapes mean optics.
- Fix motion first: polar alignment, balance, cables, wind, guiding.
- Check for differential flexure if guiding looks good but subs do not.
- Set backfocus spacing, including filter thickness.
- Measure and correct tilt.
- Re-focus and re-test after every change, on a dense star field near the zenith.
Salvaging data you already have
If only some subs are affected, reject them. Siril can filter frames by FWHM and roundness before stacking, and PixInsight’s SubframeSelector does the same with eccentricity. Our stacking software comparison covers both tools.
If every sub is affected, processing can only hide the problem. Star reduction or star removal tools can make mildly elongated stars less noticeable, but they cannot recover detail. Fix the cause and reshoot when you can.
Frequently asked questions
The most common causes are tracking or guiding errors, wind, cable drag, differential flexure, wrong field flattener spacing, sensor tilt and uncorrected coma. If all stars are stretched the same way, the cause is motion; if only the corners are affected, the cause is spacing or tilt.
Look at corner stars on a well-focused sub. If they are stretched radially, pointing toward or away from the center, the sensor is too close to the flattener, so add spacing. If they are stretched tangentially, around the center, the sensor is too far, so remove spacing.
Look for asymmetry: one side or corner worse than the opposite one. Siril's tilt command measures the FWHM difference between corners and flags values above 10% as a tilt problem. ASTAP, N.I.N.A.'s Hocus Focus plugin and PixInsight scripts offer similar measurements.
That is the classic sign of differential flexure: the guide camera and main camera move relative to each other, so the guider holds steady while the image drifts. Rigid guide scope rings, a locked focuser, tidy cables or an off-axis guider usually fix it.
Yes. A glass filter in the light path moves the focal plane back by roughly one-third of its thickness, so add about that much to your spacing. A 1.85mm filter adds roughly 0.6mm.
Only partly. Reject the worst subs before stacking using FWHM, roundness or eccentricity filters, then use star reduction tools to make mild elongation less visible. Fixing the cause at the telescope is the only real solution.